My initial reaction to all the talk about texture/sand paper like polish was "really? textured polish?". None of them sounded very appealing to me. My first dive in the texture pool was with the OPI Liquid Sands from the Mariah Carey Collection. I liked them fine but I wasn't totally sold yet on the concept.
I started hearing talk about Zoya coming out with their own textured polish and I was excited to try them since I have been loving and definitely enjoying the colors/formula of recent Zoya releases. When the sneak peeks of the Pixie Dust Collection appeared I was really happy with the colors. They looked very pretty and wearable. Not quite the in your face boldness of the Liquid Sands. Now that I think about it, maybe that is why I wasn't totally in love with the trend at first. It seemed to be a little too much, the bright colors on top of the texture. Zoya's color choices were much more subtle and ultra wearable. There were no swatches available at first, so it was hard to really tell if they were going to be all I had hoped for. The anticipation was crazy as I awaited their arrival.
More after the jump --> click the link to read the rest!
Search This Blog
Showing posts with label Black. Show all posts
Thursday, March 28, 2013
Monday, March 25, 2013
Life and all the things in-between aka An update!
Hello lovelies!
It's been a while I know... Dom & I have had an onslaught of crazy life-itis it seems! Here's my update though :)
Since I saw most of you last (on the regular) I was working through a deployment and all that it entails. Well my husband since came home then deployed again. Haha the life of being government property eh? I feel bad for him being gone so much but I know that he enjoys his job, so that makes it easier I'm sure. But back to the update...
When I was preparing for his previous homecoming I looked like this...
More after the jump!
It's been a while I know... Dom & I have had an onslaught of crazy life-itis it seems! Here's my update though :)
Since I saw most of you last (on the regular) I was working through a deployment and all that it entails. Well my husband since came home then deployed again. Haha the life of being government property eh? I feel bad for him being gone so much but I know that he enjoys his job, so that makes it easier I'm sure. But back to the update...
When I was preparing for his previous homecoming I looked like this...
More after the jump!
Thursday, November 1, 2012
Different Dimension Santa Baby Christmas Collection ... AMAZEBALLS!!!!
Get ready ladies, this is gonna be a good one! Missi Barry is the creator of Different Dimension nail polish and her latest collection for the Holiday Season is amazing. I had a chance to chat with Missi and find out a bit about what makes her tick.
Dom: What made you start making polish?
Missi: I am a licensed nail tech and I had to have joint replacement surgery late this past spring, I ordered a bunch of stuff beforehand and started playing around with it, just for personal use. After years of doing nails you start to notice how similar all of the polishes tend to look. I just wanted something different to wear! I posted some pics online and things just took off! I now do this full-time and work two days a week as a nail tech! I love it and I hope it shows!
Dom: Are you a polish collector and if so what are some of your prized colors or lemmings?
Missi: OMG!!! Yes!!! I'm a huge Whimsical Ideas by Pam fan as well as Contrary Polish. I am dying to get my hands on some Nerd Lacquer!!! As far as lemmings - I would have to say Nancy's Birthday and My Friend Carol by Whimsical Ideas and then I have a whole list of Nerd Lacquers I want - Don't Blink, Entirely Unlike Tea, Don't Panic, Outed by A Probot, All of Time and Space, Holy Grail, Smoke Dragon...
Dom: Santa Baby ... why was that song the inspiration for this collection?
Missi: It was between Santa Baby and My Grown-Up Christmas List. I always try to have a theme and Santa Baby is just so fun and girly and I LOVE it! I'm hoping everyone gets it. I didn't want to make polishes that were only specific to Christmas though. I think most of this collection can be worn year round. Like Santa Baby can definitely be worn on Valentines Day.
Dom: I have several of your lacquers and I love each and every one! What do you think makes your polish so special?
Missi: Honestly I make polishes that I would (and do) wear personally. I don't just throw glitter into some base and shake it up and pray it looks nice. Every polish is thought out well beforehand, colors that I want to use, what I want it to look like, if there is a cause behind it or a theme. I am obsessed with color and glitter so I'm sure that helps! I probably fail more than I succeed but sometimes I will go back after a month or two and look and add something that makes it a final product. I also measure everything and write it down! I think consistency throughout is such an important thing so many do not follow in this small community of ours.
Dom: What are inspirations? What keeps you doing what you do?
Missi: Personally my boys are my inspiration - everything I do in my life I do to better their lives. I was working 50+ hours a week in a nail shop unable to spend any time with them, I now am down to two days a week and I am able to be a mommy again! That is what keeps me going. I don't think that there is a greater gift than our children, so I try to do as much as I can to stay as involved as possible with them. I am so thankful this is allowing me to do that now! Other inspiration - I am a HUGE Andy Warhol fan, love love love him and any type of art in general. Hell, I even sat in the Christmas aisles (you know back in August, lol!) at Hobby Lobby for hours just gazing at all the wonderful colors and collections of ornament and decorations!
I really enjoyed getting to know Missi almost as much as I enjoy her polish! ; ) When I received my package of polish from Missi, I just about died! I had ordered several for my own collection and was also looking forward to reviewing the Santa Baby Line. It is safe to say that this is one of the best packages I have received in a while! When I began to open the little bundles of joy, I loved each one just a bit more than the last. This collection is full of amazing color and texture combinations! Let's get started shall we?
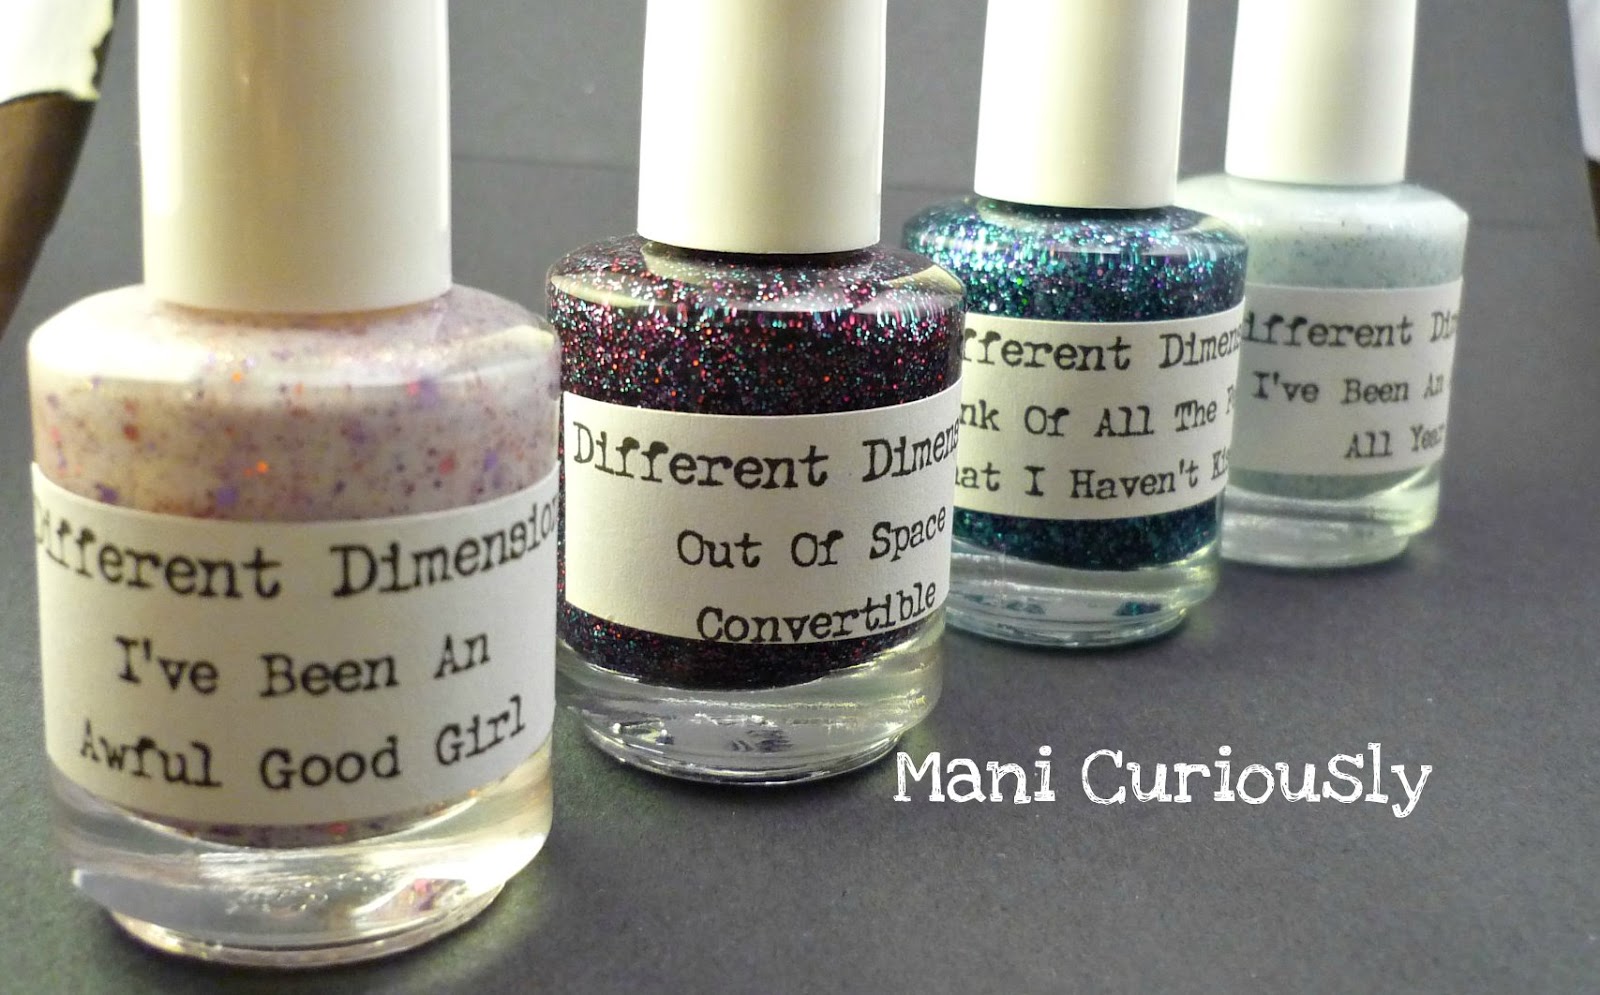
There are eight polishes in this collection with one bonus polish that will make you wanna smack yo mama! Santa Baby, Hurry Down the Chimney Tonight, I'll Wait Up For You Dear, Sign Your 'X' on the Line, I've Been An Angel All Year, I've Been an Awful Good Girl, Think of All the Fellas That I Haven't Kissed and Out of Space Convertible make up the Santa Baby Collection with a stunner called Chrsitmahanakwanzika as a bonus!
For all of these swatches I used Beauty Secrets Base Coat. I only used Orly Glosser Top Coat on two of the polishes, I will note those later in the post. All the polish descriptions are taken from the Different Dimensions Etsy Shop site. I am going to take a moment and make a blanket statement about all of these lacquers ... ALL OF THEM paint like a dream and even out nicely!
Santa Baby has a clear base with red, pink and white glitters in different sizes mixed with silver holographic micro-glitter.
Hurry Down The Chimney Tonight is a jumble of asymmetrical red and white glitters. Looks amazing over any color!
I'll Wait Up For You Dear is my vision of what Christmas in a bottle would look like. Green and red glitters in a clear base - so simple, yet so Christmassy!
Sign Your 'X' On The Line is a silver shred and gold flakie top coat. It is neither really gold nor really silver but it is really amazing on!
With all of the wonderful holidays this time of year Missi decided it was important to try and make something fun for everyone to wear! Christmahanakwanzika has all of the amazing colors of all 3 holidays mixed into one polish! Definately a fun topper!
I've Been An Angel All Year has white, blue and silver glitters in a white base with slight blue shimmer added. Full coverage in 2 coats.
Think Of All The Fellas That I Haven't Kissed - The colors in this were inspired in part by Missi's own Christmas tree trimmings. Rich purples, blues and teals in a clear base. Buildable in 3 coats, but looks amazing as a topper! (I only used 2 coats for these images with no undies)
Dom: What made you start making polish?
Missi: I am a licensed nail tech and I had to have joint replacement surgery late this past spring, I ordered a bunch of stuff beforehand and started playing around with it, just for personal use. After years of doing nails you start to notice how similar all of the polishes tend to look. I just wanted something different to wear! I posted some pics online and things just took off! I now do this full-time and work two days a week as a nail tech! I love it and I hope it shows!
Dom: Are you a polish collector and if so what are some of your prized colors or lemmings?
Missi: OMG!!! Yes!!! I'm a huge Whimsical Ideas by Pam fan as well as Contrary Polish. I am dying to get my hands on some Nerd Lacquer!!! As far as lemmings - I would have to say Nancy's Birthday and My Friend Carol by Whimsical Ideas and then I have a whole list of Nerd Lacquers I want - Don't Blink, Entirely Unlike Tea, Don't Panic, Outed by A Probot, All of Time and Space, Holy Grail, Smoke Dragon...
Dom: Santa Baby ... why was that song the inspiration for this collection?
Missi: It was between Santa Baby and My Grown-Up Christmas List. I always try to have a theme and Santa Baby is just so fun and girly and I LOVE it! I'm hoping everyone gets it. I didn't want to make polishes that were only specific to Christmas though. I think most of this collection can be worn year round. Like Santa Baby can definitely be worn on Valentines Day.
Dom: I have several of your lacquers and I love each and every one! What do you think makes your polish so special?
Missi: Honestly I make polishes that I would (and do) wear personally. I don't just throw glitter into some base and shake it up and pray it looks nice. Every polish is thought out well beforehand, colors that I want to use, what I want it to look like, if there is a cause behind it or a theme. I am obsessed with color and glitter so I'm sure that helps! I probably fail more than I succeed but sometimes I will go back after a month or two and look and add something that makes it a final product. I also measure everything and write it down! I think consistency throughout is such an important thing so many do not follow in this small community of ours.
Dom: What are inspirations? What keeps you doing what you do?
Missi: Personally my boys are my inspiration - everything I do in my life I do to better their lives. I was working 50+ hours a week in a nail shop unable to spend any time with them, I now am down to two days a week and I am able to be a mommy again! That is what keeps me going. I don't think that there is a greater gift than our children, so I try to do as much as I can to stay as involved as possible with them. I am so thankful this is allowing me to do that now! Other inspiration - I am a HUGE Andy Warhol fan, love love love him and any type of art in general. Hell, I even sat in the Christmas aisles (you know back in August, lol!) at Hobby Lobby for hours just gazing at all the wonderful colors and collections of ornament and decorations!
I really enjoyed getting to know Missi almost as much as I enjoy her polish! ; ) When I received my package of polish from Missi, I just about died! I had ordered several for my own collection and was also looking forward to reviewing the Santa Baby Line. It is safe to say that this is one of the best packages I have received in a while! When I began to open the little bundles of joy, I loved each one just a bit more than the last. This collection is full of amazing color and texture combinations! Let's get started shall we?
There are eight polishes in this collection with one bonus polish that will make you wanna smack yo mama! Santa Baby, Hurry Down the Chimney Tonight, I'll Wait Up For You Dear, Sign Your 'X' on the Line, I've Been An Angel All Year, I've Been an Awful Good Girl, Think of All the Fellas That I Haven't Kissed and Out of Space Convertible make up the Santa Baby Collection with a stunner called Chrsitmahanakwanzika as a bonus!
For all of these swatches I used Beauty Secrets Base Coat. I only used Orly Glosser Top Coat on two of the polishes, I will note those later in the post. All the polish descriptions are taken from the Different Dimensions Etsy Shop site. I am going to take a moment and make a blanket statement about all of these lacquers ... ALL OF THEM paint like a dream and even out nicely!
Santa Baby has a clear base with red, pink and white glitters in different sizes mixed with silver holographic micro-glitter.
| Sinful Colors Snow Me White & Rimmel London Black Satin |
| Sinful Colors Snow Me White & Rimmel London Black Satin |
| Look at that light!!! |
| Sinful Colors Snow Me White, W&W Red Red, Rimmel London Black Satin, China Glaze Holly-Day |
| Sinful Colors Snow Me White, W&W Red Red, Rimmel London Black Satin, China Glaze Holly-Day |
| w/Orly Glosser top coat |
I've Been An Awful Good Girl has a white base with pink(ish) shimmer and different sized pink and purple glitters throughout in different sizes.
| 2 Coats and look how smooth it is! w/Orly Glosser top coat |
Out Of Space Convertible is a black jelly polish with pink, purple and blue micro holographic glitters, looks best over black, but can be built in 3 coats. (again, I only used 2 coats for these images with no undies)
Well there ya have it! I am going to give Different Dimensions Santa Baby Collection an A+! All of colors were amazing to work with and I will definitely be wearing these again and again during this holiday season and beyond! I highly recommend this line to all of you and while you are shopping for these beauties pick up a few of Missi's other polishes. You will not be disappointed!
Missi has been kind enough to issue a special discount for the month of November for Mani Curiously readers. So head over to her shop grab some awesome polish!
Different Dimension Esty Shop: http://www.etsy.com/shop/DIFFERENTdimension?ref=top_trail
Don't forget your special 20% off reader discount code when you checkout!
manicuriously20
Like Different Dimensions on Facebook: https://www.facebook.com/DIFdimension?fref=ts
Tell me what you think. Do you see any must haves in this collection?
This is a free sample given to me by Different Dimension. Reviewing this sample in no way impacts my review of the product. My views are my own and are expressed accurately and fairly to best of my ability.
Tuesday, October 30, 2012
Drip Mani Tutorial with Cult Nails!
Hey there :) Happy Halloween Eve!
Dom & I have been participants in the Go Pink Wednesdays campaign to bring awareness to Breast Cancer through pink manicures on wednesdays during the month of October. It's been a great experience and I've loved coming up with pink themed manicures; however, it's also my favorite time of year! Once I started thinking about how I could incorporate the two, pink BCA & Halloween, I knew I had something I could really enjoy! Well my favorite pink/halloween-ish manicure was my Pink Drip Mani. It seemed several of you really loved it as well so here we are... a tutorial!
Let me preface this tutorial with a few things though...
What you DON'T need:
I tried to include as many pictures as possible to cover how you, our lovely reader, might learn best from the tutorial. Below are singular photos. As a side note I had some technical difficulties like my camera battery was acting up, the daylight was fading fast and a demanding toddler LOL... so some of these photos aren't the best quality and some clean up in the final shot was a little lacking, so please forgive me :)
STEP 1
Start with a base color, fully base/top coated and dry. I chose my favorite green, Cult Nails - Deal With It from the summer release, CoCo's Collection. This green is slightly sheer and I am a crazy person with VNL (visible nail line) so I did 3 thin coats in this photo. This polish is a dream to work with, builds nicely and clean up is a breeze. As a side note... this is the perfect Halloween type green. I just love it! Plus the beautiful shimmer is just too much!!
STEP 2
On your base place anywhere from 1 to 3 dots on each nail at varying levels with your contrasting other color. For this mani I chose Cult Nails - Nevermore. I like to refer to Nevermore as the best black ever. It is seriously shiny, beautiful in ONE coat and quick drying. If you never buy another Cult Nails polish- buy Nevermore... I promise you won't be disappointed!!
This step takes a smidge of consideration. The part that makes the drip look so interesting is how different each one looks. I also try to be aware of where my previous dots were so I don't accidentally repeat a dot pattern.
STEP 3
This step is pretty simple in the fact that all you need to do is draw a line from your dot to the edge of your nail. The line does not need to be thick and works better if it isn't as thick as the dot. Don't worry about how thick or clumpy the paint looks... it'll smooth out with top coat.
STEP 4
Ok... first I apologize I did not take a separate step 4 photograph as I got distracted and before I knew it was almost done and onto step 5 before I remembered! SO SORRY! :(
So this step is the one that looks the hardest but is really the easiest in my opinion. What you're ultimately doing is connecting the lines. I do this by drawing a curved line from one line to the next. Almost curved lines like a spider web? Don't go too far down since you'll want room to do the final detail work. That way if you decide to make the tip of your nail look like it has been dipped more then it's just adding.... ****REMEMBER**** less is more in this particular look... the artistry is in the details so work in small amounts. You'll want to keep those lines as curved as possible to achieve that true drip look.
STEP 5
In this step you are simply finishing up the edges, filling in the empty spots where you have curved lines and putting on your final touches. This is the part where you want to really look at your drips and consider how you want them to look and what sort of nuances do you want to show. In the steps 3/4/5 I added partial drip lumps on my middle finger and a couple of separate drips on the pinky & middle fingers. You'll want to go on the sides of your nails lightly with your tool so the drips have the appearance of continuing off your nails. This is the messy and unfortunate part. You'll get paint on your fingers and into the edge/crack of your nail. This is where a good clean up regimen will be needed. The black looks lumpy and clumpy but I promise it all levels out with a good top coat. (side note: the clean up brush I use is a concealer brush made by e.l.f. and $1, available at Target)
FINISHED!
Clean up the edges of your nails and top coat!
I hope you've enjoyed this tutorial and it helps you achieve your desired drip mani :) Let me know if you need any assistance or if there is a step that isn't clear :) Be sure to post your drip manis to the fan page on facebook!
xo & Happy Halloween,
Dom & I have been participants in the Go Pink Wednesdays campaign to bring awareness to Breast Cancer through pink manicures on wednesdays during the month of October. It's been a great experience and I've loved coming up with pink themed manicures; however, it's also my favorite time of year! Once I started thinking about how I could incorporate the two, pink BCA & Halloween, I knew I had something I could really enjoy! Well my favorite pink/halloween-ish manicure was my Pink Drip Mani. It seemed several of you really loved it as well so here we are... a tutorial!
Let me preface this tutorial with a few things though...
What you DON'T need:
- Doubt
- Nail art abilities
- Skill/talent
- any special tools
Never doubt yourself... I am no more talented than you and if I can do it, so can you! Nail art is just that, art. Art is subjective and in the eye of the beholder. Never feel like it is an achieveable skill, it is always within you, just believe. Again, no special skills or talent is necessary for this look and many others, just a little patience would help! Lastly, in my opinion there is no real need for any special nail art tools. Do they make life easier? Yes! But truly they are not necessary as long as you look around and get inventive with the tools available to you.
What you DO need:
- Two polish colors- preferrably two that are very different
- General items like acetone/polish remover, cotton balls, paper towel
- A round tipped item to make dots
- ball point pen
- toothpick
- pencil eraser
- bobby pin
- or if you have a set- Dotting Tool
- A thin brush or item to draw a line with
- toothpick
- orange stick/cuticle pusher
- pencil
- or if you have one- a brush or nail art striper
- A picture or some sort of visual idea of what you'd like your drips to look like
- Base/Top Coat
I tried to include as many pictures as possible to cover how you, our lovely reader, might learn best from the tutorial. Below are singular photos. As a side note I had some technical difficulties like my camera battery was acting up, the daylight was fading fast and a demanding toddler LOL... so some of these photos aren't the best quality and some clean up in the final shot was a little lacking, so please forgive me :)
STEP 1
Start with a base color, fully base/top coated and dry. I chose my favorite green, Cult Nails - Deal With It from the summer release, CoCo's Collection. This green is slightly sheer and I am a crazy person with VNL (visible nail line) so I did 3 thin coats in this photo. This polish is a dream to work with, builds nicely and clean up is a breeze. As a side note... this is the perfect Halloween type green. I just love it! Plus the beautiful shimmer is just too much!!
STEP 2
On your base place anywhere from 1 to 3 dots on each nail at varying levels with your contrasting other color. For this mani I chose Cult Nails - Nevermore. I like to refer to Nevermore as the best black ever. It is seriously shiny, beautiful in ONE coat and quick drying. If you never buy another Cult Nails polish- buy Nevermore... I promise you won't be disappointed!!
This step takes a smidge of consideration. The part that makes the drip look so interesting is how different each one looks. I also try to be aware of where my previous dots were so I don't accidentally repeat a dot pattern.
STEP 3
This step is pretty simple in the fact that all you need to do is draw a line from your dot to the edge of your nail. The line does not need to be thick and works better if it isn't as thick as the dot. Don't worry about how thick or clumpy the paint looks... it'll smooth out with top coat.
STEP 4
Ok... first I apologize I did not take a separate step 4 photograph as I got distracted and before I knew it was almost done and onto step 5 before I remembered! SO SORRY! :(
So this step is the one that looks the hardest but is really the easiest in my opinion. What you're ultimately doing is connecting the lines. I do this by drawing a curved line from one line to the next. Almost curved lines like a spider web? Don't go too far down since you'll want room to do the final detail work. That way if you decide to make the tip of your nail look like it has been dipped more then it's just adding.... ****REMEMBER**** less is more in this particular look... the artistry is in the details so work in small amounts. You'll want to keep those lines as curved as possible to achieve that true drip look.
STEP 5
In this step you are simply finishing up the edges, filling in the empty spots where you have curved lines and putting on your final touches. This is the part where you want to really look at your drips and consider how you want them to look and what sort of nuances do you want to show. In the steps 3/4/5 I added partial drip lumps on my middle finger and a couple of separate drips on the pinky & middle fingers. You'll want to go on the sides of your nails lightly with your tool so the drips have the appearance of continuing off your nails. This is the messy and unfortunate part. You'll get paint on your fingers and into the edge/crack of your nail. This is where a good clean up regimen will be needed. The black looks lumpy and clumpy but I promise it all levels out with a good top coat. (side note: the clean up brush I use is a concealer brush made by e.l.f. and $1, available at Target)
FINISHED!
Clean up the edges of your nails and top coat!
![]() |
| 3 thin coats of Cult Nails - Deal With It, drips in Cult Nails - Nevermore base coat Duri - Rejuvacote & top coat of Seche Vite |
xo & Happy Halloween,
Tuesday, October 23, 2012
New Indie Love for Chirality
Dom: What got you interested in polish and eventually helped you decide to make it?
Amanda: I was diagnosed with Hodgkin's Lymphoma earlier this year which is a rare form of cancer. I was forced to take a leave of absence from school which pushed any sort of plans of graduation, setting up a practice, or having children back further than I wanted it to. Needless to say, it was a bit depressing. I was also stuck inside a house for many months unable to go anywhere unless it was to get nasty chemo injected into my body. This sort of unhappy state caused me to revert to some of the hobbies I used to enjoy several years back, particularly nail polish. So much has changed thanks to social networks and the increase in indie nail polish. After awhile, my nerd side kicked in and I found myself intrigued by starting my own indie polish line. The rest is history!
Dom: Where did the name for the line come from and what does it mean?
Amanda: Since I'm an Optometry student, the first year of school is pretty much nothing but science courses. One of the courses that ended up being fun was Organic Chemistry. Because I'm such a nerd, I would continue reading up on the subject outside of class and learn about various other aspects, like Chirality, which usually refers to molecules that are non-superimposable mirror image. LOL, very nerdy! Plus, I think it's a very pretty sounding name.
Dom: What made you do holos first?
Amanda: I don't know why but holos really appeal to me. I think they're beautiful, and I really wanted my first line of polish to set the standard for what fans of nail polish can expect from me.
Dom: What are some of your inspirations?
Amanda: This is going to sound corny, but my husband is my inspiration. He pushed me these past six months to fight this cancer. And then, pushed me to start this line. He's been such and inspiration that I now call him my muse. I don't know why but the first couple of times I tried making polish, they were disastrous. But, whenever my husband is around, I wind up making the polish that you now see on my Facebook page and Big Cartel store! Plus, he lets me test them out on his nails, which amuses me.
Now that we know a bit about Amanda, let's move onto the POLISH! The first collection from Chirality Nail Polish consist of four amazing holographic lacquers. When Amanda sent me the set for review I immediately ordered my two favorites! After swatching the collection I realized that I needed them all! For all of my swatches I used Beauty Secrets Base Coat, two coats of polish and Orly Glosser for the top coat. I was also lucky to get a day of beautiful sunshine so, all the shots were taken outside in full sunlight!
The back story's that Amanda uses to describe her colors are amazing so I will add them for your reading pleasure!
"In the woods, a killer stalks a group of young, nubile women. They've come off as lost, injured, and scared of what goes bump in the night, and the killer could not be happier. Little does he know that these ladies are far from lost, far from injured and very far from scared. Morning is coming quick, but not quick enough, because these ladies are ready to strike. They're ready to turn the tables on this killer and attack just before dawn."
Just Before Dawn is a super pretty fall orange base with a subtle linear holo effect. I am not generally an orange kinda of girl but this polish is nuts. It painted like a dream and with two coats I was able to get full opacity.
Dom: Where did the name for the line come from and what does it mean?
Amanda: Since I'm an Optometry student, the first year of school is pretty much nothing but science courses. One of the courses that ended up being fun was Organic Chemistry. Because I'm such a nerd, I would continue reading up on the subject outside of class and learn about various other aspects, like Chirality, which usually refers to molecules that are non-superimposable mirror image. LOL, very nerdy! Plus, I think it's a very pretty sounding name.
Dom: What made you do holos first?
Amanda: I don't know why but holos really appeal to me. I think they're beautiful, and I really wanted my first line of polish to set the standard for what fans of nail polish can expect from me.
Dom: What are some of your inspirations?
Amanda: This is going to sound corny, but my husband is my inspiration. He pushed me these past six months to fight this cancer. And then, pushed me to start this line. He's been such and inspiration that I now call him my muse. I don't know why but the first couple of times I tried making polish, they were disastrous. But, whenever my husband is around, I wind up making the polish that you now see on my Facebook page and Big Cartel store! Plus, he lets me test them out on his nails, which amuses me.
Now that we know a bit about Amanda, let's move onto the POLISH! The first collection from Chirality Nail Polish consist of four amazing holographic lacquers. When Amanda sent me the set for review I immediately ordered my two favorites! After swatching the collection I realized that I needed them all! For all of my swatches I used Beauty Secrets Base Coat, two coats of polish and Orly Glosser for the top coat. I was also lucky to get a day of beautiful sunshine so, all the shots were taken outside in full sunlight!
The back story's that Amanda uses to describe her colors are amazing so I will add them for your reading pleasure!
"In the woods, a killer stalks a group of young, nubile women. They've come off as lost, injured, and scared of what goes bump in the night, and the killer could not be happier. Little does he know that these ladies are far from lost, far from injured and very far from scared. Morning is coming quick, but not quick enough, because these ladies are ready to strike. They're ready to turn the tables on this killer and attack just before dawn."
Just Before Dawn is a super pretty fall orange base with a subtle linear holo effect. I am not generally an orange kinda of girl but this polish is nuts. It painted like a dream and with two coats I was able to get full opacity.
| Just Before Dawn |
| Just Before Dawn |
"The Symbiote is an alien life-form that came crashing down to Earth in search of female host to ooze over them and bring forth from its newfound owner a devilish and mischievous side she never knew existed. Once the Symbiote takes over, she owns the night."
The Symbiote is an amazing charcoal black holo that I could not stop looking at once I had it on! Again, I had no issues with application.
| The Symbiote |
| The Symbiote |
Cu2+ is an ridiculous blue, with a hint of teal, holographic polish. Application was flawless and this one is a favorite for sure!
| Cu2+ |
| Cu2+ |
Apollonia is my favorite of the entire collection. Mostly because I love purple but also, something about wearing a polish with that description makes me feel like a sexy beast! LOL! The application rocked and man oh man, I did not want to take this one off!
| Apollonia |
| Apollonia |
You can find Chirality Nail Polish for sale at http://www.chirality.bigcartel.com
You can also like Chirality Facebook Fan Page at https://www.facebook.com/chiralitypolish?fref=ts
Wednesday, October 17, 2012
Go Pink Wednesday and Supporting Your Loved One Tips!
So we've covered the statistical data that supports how important it is to stay on top of your breast health as well as a tutorial on Self Breast Examinations. Today we have some great tips on how to be the best supportive person to your loved one during and after their diagnosis and treatment. The statistics are real; 1 in 8 women will develop breast cancer, because odds are you'll either be the patient or the support system.
When tragedy strikes someone near and dear to us it can be difficult to not get swallowed up in our own grief. After all, it is human nature to be self centered. There is no recrimination in the facts of humanity, just honesty, and when something so horrific strikes a loved one we go through a grieving process too. However, there will be personal time for that. The most important thing you can be is a supportive loved one. But before you bound off to play Dr. Oz or even Dr. Phil there are some really great resources on how to be the best supportive YOU to your loved one.
These tips on how to be a supportive person for someone fighting Breast Cancer are according to SheKnows.com:
LISTEN AND BE PRESENT: It is important to be a good listener. Someone who has been diagnosed with breast cancer is afraid, angry and uncertain. Listening to these fears and being present with them, even in silence, can be a source of great strength for the person fighting cancer. Allowing them to express their anger and fears also demonstrates that you will be there to support them through it all, rather than abandoning them when times get tough.
BE A FACT FINDER, NOT AN ADVICE GIVER: The initial diagnosis of breast cancer can lead to shock and anxiety. It is helpful to support the individual by gathering facts about dealing with the disease, treatment options, and community resources, such as support groups. However, helping your loved ones find information is different from giving them advice about choosing their treatment or plan of care. Listen to them as they talk about their options and be helpful by finding more information as they desire, but don't give out unsolicited advice.
BE SUPPORTIVE OF YOUR LOVED ONE'S DECISION: A myriad of decisions must be made by your loved one in relation to the treatment process. Your loved one will not make these decisions lightly and it is important to be supportive of their decision, even if it is not the road you would have chosen.
LAUGH: Remember the old adage "laughter is the best medicine"? Don't be afraid to laugh and have fun. Living with cancer and supporting someone with cancer can be stressful, and learning to laugh together can help get you through the tough times that you will face.
ACKNOWLEDGE THE GRIEVING PROCESS: The diagnosis of breast cancer for a woman attacks her very femininity and many of the treatment options continue in this attack. It is normal to go through a grieving process related to the feeling of this loss of femininity. Be supportive by listening to her anger, fear, and uncertainty and don't be afraid to hug her and touch her.
GATHER A SUPPORT NETWORK: A variety of support groups are available to individuals living with breast cancer, as well as for individuals supporting a loved one with breast cancer. This is one of those times where you can't do everything alone. Ensure that you have a positive group of supporters surrounding and uplifting you as you care for your loved one and don't take on more than you can realistically do. Joining a support group is not a sign of weakness; it is a sign of strength which will be invaluable to you and your loved ones throughout this difficult time.
HAVE SOME FUN: Go do something fun! It is vital to focus on more than just the disease, because your loved one is so much more than a diagnosis. It is important to do something fun – plan a girl's night chick-flick movie marathon (or horror flick marathon if that is more to your liking), or, pending your loved one's energy level, go out to the park, go to a game, take a walk, or go out to dinner. It is OK to laugh and have fun
BE YOURSELF: It can be challenging to know what to do or say when supporting someone living with breast cancer, but it is important to be yourself. Being genuine shows your loved one how much you truly care about him or her as an individual, not a disease. A warrior has strength and is prepared to fight through the challenges. Living with breast cancer requires the strength, steadfastness, and determination of a warrior; yet it cannot be done alone; it requires an equally strong and driven group of warriors who will support their loved ones through the highs and lows -- never giving up and never letting go.
Two other great resources we found for more tips on how to be a great support system for your loved one are:
HealthyWomen.org: This is a great and quick resource for some Dos and Don'ts for your role as your loved one's support system.
Caring.com: A really great resource for 7 more tips to be the best and most supportive person to your loved one.
I really liked all three resources and they're all very real and honest in the best and honest way to support someone. Please take a look at all the resources, it could mean saving a life!
As always, to show our love and support here are our Go Pink Wednesday for Breast Cancer Awareness manicures!
For this weeks mani Dom wanted to do something a bit different and unexpected. She recently stopped by JoAnn's Fabrics and grabbed an A La Mode brand flocking set. The process is not as hard as it seemed. A bit of wet polish and some flocking powder is all you need to achieve this look. Dom was really excited to do this mani! Even though it is a messy mani to do, it really allows an infinite amount of creative ideas as well as just plain fun! We hope you like it!
When tragedy strikes someone near and dear to us it can be difficult to not get swallowed up in our own grief. After all, it is human nature to be self centered. There is no recrimination in the facts of humanity, just honesty, and when something so horrific strikes a loved one we go through a grieving process too. However, there will be personal time for that. The most important thing you can be is a supportive loved one. But before you bound off to play Dr. Oz or even Dr. Phil there are some really great resources on how to be the best supportive YOU to your loved one.
These tips on how to be a supportive person for someone fighting Breast Cancer are according to SheKnows.com:
LISTEN AND BE PRESENT: It is important to be a good listener. Someone who has been diagnosed with breast cancer is afraid, angry and uncertain. Listening to these fears and being present with them, even in silence, can be a source of great strength for the person fighting cancer. Allowing them to express their anger and fears also demonstrates that you will be there to support them through it all, rather than abandoning them when times get tough.
BE A FACT FINDER, NOT AN ADVICE GIVER: The initial diagnosis of breast cancer can lead to shock and anxiety. It is helpful to support the individual by gathering facts about dealing with the disease, treatment options, and community resources, such as support groups. However, helping your loved ones find information is different from giving them advice about choosing their treatment or plan of care. Listen to them as they talk about their options and be helpful by finding more information as they desire, but don't give out unsolicited advice.
BE SUPPORTIVE OF YOUR LOVED ONE'S DECISION: A myriad of decisions must be made by your loved one in relation to the treatment process. Your loved one will not make these decisions lightly and it is important to be supportive of their decision, even if it is not the road you would have chosen.
LAUGH: Remember the old adage "laughter is the best medicine"? Don't be afraid to laugh and have fun. Living with cancer and supporting someone with cancer can be stressful, and learning to laugh together can help get you through the tough times that you will face.
ACKNOWLEDGE THE GRIEVING PROCESS: The diagnosis of breast cancer for a woman attacks her very femininity and many of the treatment options continue in this attack. It is normal to go through a grieving process related to the feeling of this loss of femininity. Be supportive by listening to her anger, fear, and uncertainty and don't be afraid to hug her and touch her.
GATHER A SUPPORT NETWORK: A variety of support groups are available to individuals living with breast cancer, as well as for individuals supporting a loved one with breast cancer. This is one of those times where you can't do everything alone. Ensure that you have a positive group of supporters surrounding and uplifting you as you care for your loved one and don't take on more than you can realistically do. Joining a support group is not a sign of weakness; it is a sign of strength which will be invaluable to you and your loved ones throughout this difficult time.
HAVE SOME FUN: Go do something fun! It is vital to focus on more than just the disease, because your loved one is so much more than a diagnosis. It is important to do something fun – plan a girl's night chick-flick movie marathon (or horror flick marathon if that is more to your liking), or, pending your loved one's energy level, go out to the park, go to a game, take a walk, or go out to dinner. It is OK to laugh and have fun
BE YOURSELF: It can be challenging to know what to do or say when supporting someone living with breast cancer, but it is important to be yourself. Being genuine shows your loved one how much you truly care about him or her as an individual, not a disease. A warrior has strength and is prepared to fight through the challenges. Living with breast cancer requires the strength, steadfastness, and determination of a warrior; yet it cannot be done alone; it requires an equally strong and driven group of warriors who will support their loved ones through the highs and lows -- never giving up and never letting go.
Two other great resources we found for more tips on how to be a great support system for your loved one are:
HealthyWomen.org: This is a great and quick resource for some Dos and Don'ts for your role as your loved one's support system.
Caring.com: A really great resource for 7 more tips to be the best and most supportive person to your loved one.
I really liked all three resources and they're all very real and honest in the best and honest way to support someone. Please take a look at all the resources, it could mean saving a life!
As always, to show our love and support here are our Go Pink Wednesday for Breast Cancer Awareness manicures!
For this weeks mani Dom wanted to do something a bit different and unexpected. She recently stopped by JoAnn's Fabrics and grabbed an A La Mode brand flocking set. The process is not as hard as it seemed. A bit of wet polish and some flocking powder is all you need to achieve this look. Dom was really excited to do this mani! Even though it is a messy mani to do, it really allows an infinite amount of creative ideas as well as just plain fun! We hope you like it!
| Rimmel London Posh Pink, W'n'W Tickled Pink, Sinful Colors Snow Me White & Flocking Powder |
| This mani is flocking awesome!!! ;) |
Continuing with a little nail art in support of Go Pink Wednesday and the upcoming Halloween holiday, E's mani is a fun and funky shredded tape mani! She used MAC - Ice Cream Cake as a lovely pink base, Cult Nails - Nevermore for the accent nail and shredded tips with a dash of Pretty and Polished - Punk'd Up Betty on the accent nail. Tape manis are easy to do and can really take an aging mani through another week of awesomeness! A tutorial on E's methods can be found HERE. This was a lot of fun and we hope you love it!
![]() |
| "Pre taping" MAC - Ice Cream Cake Cult Nails - Nevermore and Pretty & Polished - Punk'd Up Betty as accent nails |
![]() |
| "Post taping" MAC - Ice Cream Cake Cult Nails - Nevermore and Pretty & Polished - Punk'd Up Betty as accent nails and shredding |
Subscribe to:
Posts (Atom)